Monday, 8 June 2009
Curved piecing workshop.
On Saturday I facilitated a workshop at Step by Step Patchwork Centre in South Molton on a very simplified way of piecing curves.
Having completed lots of samples and a finished piece all well in advance I decided, at the last minute, like you do, to make up a "sample" of how well this technique would work for a landscape.
The sample was then made into a book cover which I rather like. Several ladies went with the landscape theme so was glad I'd prepared a visual sample and not relied on a verbal description.
Sunday, 31 May 2009
Out of my comfort zone
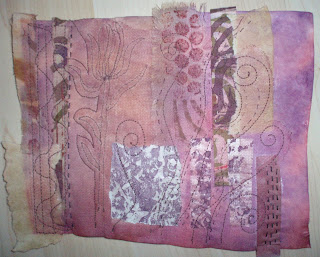
I've just completed a three day workshop at Cowslip Workshops with textile artist Cas Holmes whose background is in fine art, and am positive spoke a different language to me... a specialist "Art" language!
The first day was surface decoration onto both paper and fabric using acrylic paint. Cas uses very basic materials and isn't lured by the latest greatest new product, which is really refreshing.
Printing was with a rubber stamp we'd carved during our first exersise and making marks with whatever else we could find around us. We needed to amass a collection of fabrics/papers of differing weights and textures with which to work from on days 2 and 3.
An integral part of the course was recording everything in our mandatory sketchbooks, therefore building up a resource bank of ideas and information either to use or discard! Hard habit to get into but definately proved to be successful.
Day two...using the work completed on day one, plus "sunprinting" that we managed to do as the weather permitted, we began to put together a collage, adding other ephemera, found objects or fabrics as desired to create a "piece of work". Again the sketchbook recording figured heavily.
Day three was bliss, handstitching outside in glorious sunshine, can't think of anything better!
Although I felt out of my depth some of the time it was a worthwhile experience and have lots of areas for continued development.
Thursday, 21 May 2009
Dyes are out again!
Finally I have managed to "random dye" some threads with results that I'm pleased with. Over the years I've tried on and off to get results like the hand dyed threads you can buy, but have remained unsuccessful.....until now.
Think a lot of the problem was that i just sloshed a bit of dye about and hoped for the best!! So, out came the Helen Deighan book, Dyeing in Plastic bags, and, something I don't do very often, actually read the chapter on dyeing threads and followed the instructions, again something I'm not too good at!
Perhaps I should do more of it as the results prove. They were exactly what I wanted, pale soft heathery coloured threads! So glad "old dogs" can be taught "new tricks"!
Monday, 11 May 2009
Absolute Joy
I was incredibly privileged this weekend to enjoy a workshop with Frances Pickering whose work is exquisite. Words fail me in trying to express just how much I enjoyed the two days. She's an amazingly generous, encouraging and inspirational tutor.
This bookmaking workshop was right up my street as I just love making books, all sorts of books and book covers.
The cover was made from pelmet vilene coloured with disperse dyes the flowers were then added using coloured pencils. When satisfied with my result it was given a coat of acrylic wax to seal it. Then detail and decoration was added using handstitching.
Pages were coloured with that wonderful "Brusho" stuff and stitched into place.
So far I've only started to fill one page but my aim is to practice drawing and painting various flowers within the pages in the hope it will all become much easier...
Sunday, 10 May 2009
Back in the Northern Hemisphere
..... and I haven't been completely idle! Have been doing some dyeing, yes MORE dyeing...
The method for dyeing these was given to me by a kindred spirit,(thanks Vinnie).
I took 15 plastic cups and arranged them in a 5,4,3,2,1 triangle formation. Then mixed up 200mls of procion dye concentrate in three colours(primaries) and distributed the colours in varying amounts into each pot. Starting with colour 1 on one side only of my triangle formation I put 1tsp in the pots on row 1, 2tsp in row 2, 3 in row 3 and so on. Then, starting from one of the other sides of the triangle I did the same with my second colour and on the third edge of my triangle did the same with my third colour. How confusing does that sound!!!! But honestly if you work it out on paper first it's simple, just a challenge to write!
Water, salt and soda solution was then added to each cup. The dye from each cup was then transferred to a plastic bag and a fat quarter(ish) was added to each bag, left overnight and voila! Have never really been so "measured" in my dyeing but the results were really pleasing and surprising.
I did three runs reducing the amount of dye concentrate in each run to produce paler shades. Plus a bit of an experiment adding black to the primaries as I wanted to dye some greys.
Guess i need to get sewing now.
Tuesday, 21 April 2009
Repurposing books.....
On a rather lovely day out in Melbourne with my sister visiting the particularly trendy Fitzroy Street, Brunswick street and Rose St Market we spotted some tired,and in some cases rather battered books (well just their hard covers) that had been given a new lease of life, that of a delightful notebook.
We couldn't hit the op shops fast enough to find some books that needed retiring from one purpose and given another, both settling on the childrens "Little Golden Books" with their dated illustrations and simple text. (The blue cover on the other book was also appealing so had to snap it up as well)
After removing the hardcover and cutting new pages the same size as the original ones from many different papers the whole lot was spiral bound very cheaply at a local printers. I did keep several of the original story pages within my notebook just to add to it's charm.
A button and tie was added as I always tuck loose bits of paper into any notebooks used and they inevitably fall out! Those old Ladybird books would be great so will be scouring my local charity shops next week!
This will probably be my last post from this side of the world as sadly we head back on Thurday, will miss the companionable creative time spent here with my wonderful sister.... roll on next year.
....and yet another bag!
Two weeks ago my youngest daughter and husband arrived here in Australia and of course had the whole "Show and Tell" of my time here prior to their arrival. Erin was really taken with my oversized bag, thinking it very "trendy" and "please can you make me one". So, the day after her arrival I showed her the delights of the local Spotlight store, that has kept me supplied throughout my visit, where she picked out some fabric. Voila, a few hours later the bag was hers.
Saturday, 4 April 2009
.....from sketch to print
We made our third, and sadly final visit to the Art Dept last Friday. Debbie and I had decided that we'd like to have a go at making our own screens. Firstly the design had to be drawn onto paper so i sketched a "gum tree" in the garden whilst sitting in the hot sunshine, oh life's hard! Really wanted my print to be "sketchy rather than a solid linear one.
The sketch was then transferred at a local copy shop onto a transparency then hot footed back to the studio for the next stage. A blank screen was then coated with photo emulsion in a dark room then left to dry. When dry the transparency was placed on a lightbox, covered with the dried coated screen, exposed for 30 seconds to ultra violet light then taken off and rinsed in water. Hey presto my tree was there! The black areas printed on the transparency prevent the emulsion curing under the ultra violet light and so when the screen is rinsed those areas are washed away leaving them open to transfer colour through.
Very chuffed with the results, hope to be able to bring my screen back with me for further use!
Friday, 3 April 2009
Last of my purchased fabric....
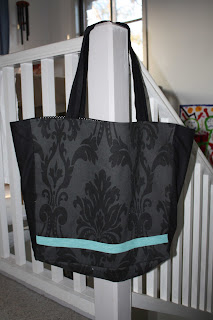
Decided that I'd like to use a little of my screenprinted fabric along with the last of the purchased bits and make a "largish" bag, pictures show front and back view. Well, large it is, in fact it's huge. I made the pattern up, just cutting pieces of newspaper the sort of size I thought would work.... The pieces themselves looked a reasonable size but the "capacity" when made up isn't instantly visible from flat bits of newspaper!
It will certainly hold lots and lots of "stuff"
Saturday, 28 March 2009
Screenprinting can be addictive.....
My brother in law teaches in a senior school with an amazing Art Department and on an opportune social engagement, Debbie met one of the Art lecturers. Well you know how one conversation can lead to another and.... we found ourselves on a tour of the department and an invitation to use the printmaking facilities. We spent two fantastic sessions screenprinting, using screens already made within the department. These are some of the results, fell in love with the "Agapanthus" screen and used it quite a lot.
The tape used on my sketch book cover was printed with this piece, hence the "blank" line running through!
....and finally just had to make up a fabric basket using some of my new treasures.
The tape used on my sketch book cover was printed with this piece, hence the "blank" line running through!
....and finally just had to make up a fabric basket using some of my new treasures.
....more scraps to use up!
Decided to use the bits of fabric left over from my basket making extravaganza to make a long awaited sketchbook cover. The appliqued leaves were from fabric I stamped a spiral onto using a rolled up kitchen sponge! Needs must and all that.
Couldn't resist the "Made in Australia" tag from a shirt find in... you guessed an op shop! The tape ties were screenprinted by yours truly.
Fabric is a wondrously varied invention of man.....
....and what pleasure it's given me over the last few weeks. I purchased 2.25 meters of fabric to make my stylish apron and have been using up the "surplus" (plus a retro nightie I'd picked up on my frequent op shop trawls), on the few projects photographed. Having decided that I needed to learn how to put in a zip and never sucessfully achieved it before I thought the opportunity to use Deb's far more logical mind than mine too good an opportunity to miss! So... she worked out the "how", instructed me and voila my little zipped bag was created.
The snap purse, again something that Debbie worked out and I just had the pleasure of making! We'd picked up some rather interesting crocheted lurex purses on a op shop trawl and stripped away the lurex part and re-used the clasp.
The waist apron design was a joint effort and am very pleased with the results.
Wednesday, 18 March 2009
Well, thought it was time I took tentative steps back into the world of blogging! Am in Australia with my lovely sister and her family for 7 and a bit weeks and savouring every precious moment. She has a little haven on the upper floor of her house where we've wiled away many a creative hour stitching companionably. Before I arrived she compiled a "to go" list and a "to do"list both of which we're working our way through, but the lists seem to grow ever longer and time is getting ever shorter. Thought I'd post a few of the sewing project pics here to get me up and running again in blogland. It's been delightfully relaxing to sew just for the sake of it with such great company, in such a lovely space.
When I arrived she'd made some great slippers for me,(check out her blog to see them and her apron) here woollen, warm and cosy just the job, along with two beautiful fabric baskets. Cos she's the sharing type (phew) she gave me a masterclass in the construction of said baskets and I went into production big time!
We've got some printing planned for later this week so watch this space....
First two photo's are of one of the projects Deb had pre-orgainsed for us... A 1950s style reversible apron, perhaps it will turn me into a domestic goddess like her!!
When I arrived she'd made some great slippers for me,(check out her blog to see them and her apron) here woollen, warm and cosy just the job, along with two beautiful fabric baskets. Cos she's the sharing type (phew) she gave me a masterclass in the construction of said baskets and I went into production big time!
We've got some printing planned for later this week so watch this space....
Subscribe to:
Posts (Atom)